In this article, I’ll explain the various methods to expose Kubernetes services to the outside world, comparing their pros and cons. To make things clearer, I’ll also include examples with YAML manifests.
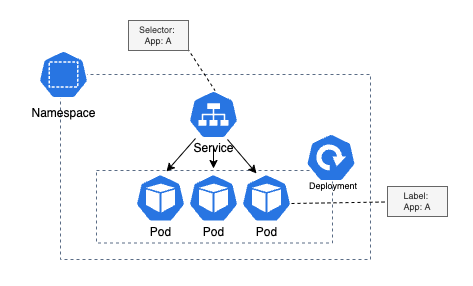
In Kubernetes, a Service acts as a virtual load balancer for a group of pods within the cluster. When a request enters the cluster, the Service directs it to the appropriate pods. This matching is achieved using a Service selector and corresponding pod labels. Additionally, Services handle internal routing between pods in the cluster, using URLs formatted as shown below:
In the below diagram we can see how the service and a set of pods are linked through selector and label.

Now let’s understand different types of a service in kubernetes cluster:
CLUSTER IP:
Cluster IP service type is used when we want to expose pods only inside kuberntes cluster, so pods will not be available to the outside world. Usually database pods are managed by ClusterIP services as we don’t want database endpoints to be exposed to the outside world.
As you can notice below the declaritive definition for a service, this service has a selector of (layer: db), So only pods with label (layer: db) will match the service, means any request coming to this service will be redirected to one of these pods:
apiVersion: v1
kind: Service
metadata:
  name: mysql-db
spec:
  selector:
    layer: db
  type: ClusterIP
  ports:
  - port: 3306
    protocol: TCP
    targetPort: 3306
NodePort:

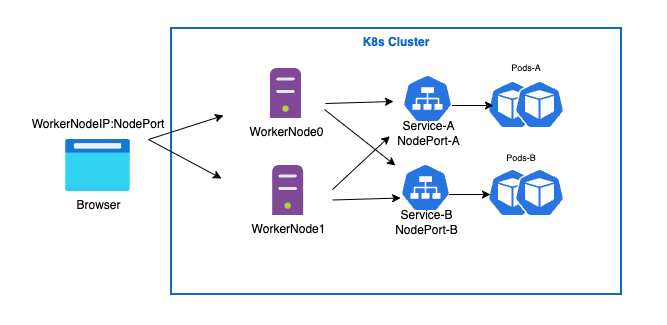
NodePort service type exposes the service to the outside world through <NodeIP>:<NodePort>.
Node IP is nothing but worker-node-ip.
The default range of the NodePort is (30000–32767).
If we will not mention the nodePort range on manifest file, it will take by default.
Each node of the cluster proxies that port to the kubernetes service port.
Don’t get confused here about the difference between port, targetPort and nodePort. So “port” is the port of the service, “targetPort” is the port of the pod. The request flow will start from the nodePort, proxied to the port then forwarded to the targetPort.
apiVersion: v1
kind: Service
metadata:
  name: devops
spec:
  type: NodePort
  selector:
    app: swiggy
  ports:
    - port: 8080
      targetPort: 80
      nodePort: 30001
LoadBalancer:

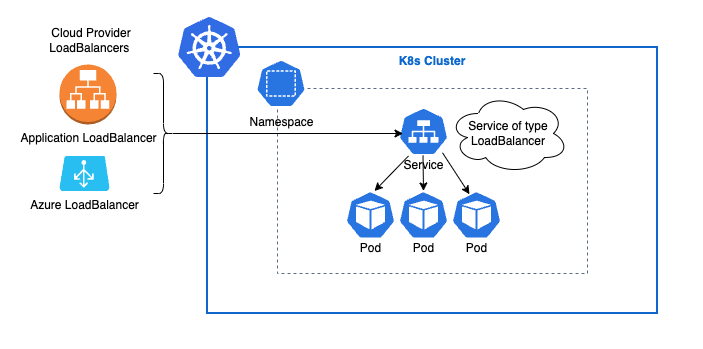
Loadbalancer service type exposes the service through a loadbalancer resource issued by the cloud provider (AWS, Azure, GCP, etc).
Once this loadbalancer is created, its DNS name will be assigned to the service.
Traffic will come to the loadbalancer, then redirected to the service to be forwarded to the pods.
This loadbalancer maintanence is the cloud provider responsibility in terms of availability and scaling.
apiVersion: v1
kind: Service
metadata:
  name: mustafa
spec:
  type: LoadBalancer
  selector:
    app: swiggy
  ports:
    - port: 8080
      targetPort: 80
Conclusion:
In conclusion, exposing Kubernetes services is a critical step in making your applications accessible, whether within the cluster or to external users. By understanding and leveraging methods like NodePort, LoadBalancer and ClusterIP. you can ensure optimal service delivery based on your application's requirements. Each method has its strengths and trade-offs, and selecting the right one depends on your infrastructure and scalability needs. Mastering these techniques enhances your ability to build robust, scalable, and secure cloud-native applications.
If you enjoy stories that help you learn, live, and work better, consider subscribing. If this article provided you with value, please support my work — only if you can afford it. You can also connect with me on Linkedin. Thank you!
